
Of all tasks involved with publishing a novel, editing is
one of the hardest. I didn’t think so when I began writing, but now I know
better…


Your story was new and, well, novel when you first pumped
out that terrific story world, concept, character, or plot (depending on what type of writer you are) and built everything up from there. The colors were vivid, the
material sleek and smooth, but now it’s like that old sweater you’ve jammed in
the back of your closet, the fabric stretched further than any fabric should be
able to stretch, the original colors a faint memory. Suddenly, it’s not so much
fun to wear anymore. At this point, it’s easy to snatch another new, shiny
story idea and play with that. Why keep tinkering with a boring, old story when
you don’t have to?
This post is for those brave souls who push past the point
of comfort, rainbows, and sunshine to bring the world high-quality literature. Today,
we’re going to cover 3 Secret Techniques to bring fun and efficiency to your
editing process.
Technique #1: Read It
Aloud
Okay, I cheated. Reading it aloud isn’t that original or
unheard of, but it’s a technique all writers should use—not only for their
books, but also for blog posts. Typos are sneaky, little creatures, hiding
within the depths of your manuscript. You could read your novel silently. You
could go over your manuscript with a red marker. But if you really want to fish
out those little buggers, you’ll have to go through the rather monotonous
process of reading it aloud. Fun, no. Effective, yes.
Purpose: To weed out typos.
Materials Needed:
A Manuscript
Directions: Read the manuscript… Aloud. It’s pretty
self-explanatory.
Technique #2: The Dot Test
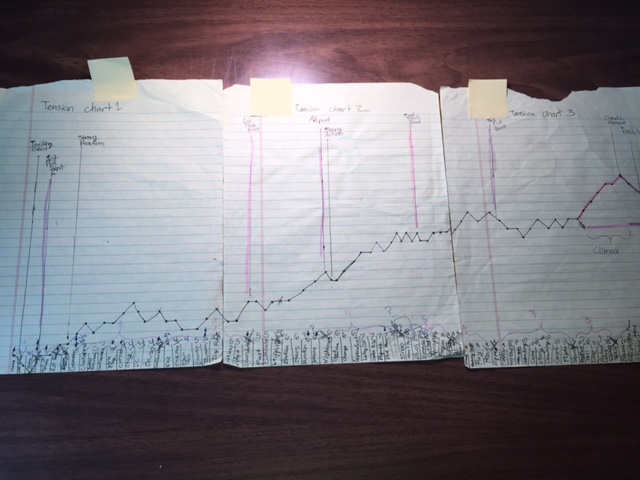
Now, here’s a technique that you probably haven’t heard of
before. I chose a more thorough, detailed method of The Dot Test. If you’d like
the basic version, check out the link above.
Purpose: To measure tension.
Materials Needed:
Pen
A Few Different Highlighters (optional)
Notebook Paper (or any lined paper)
A Brain (also optional, since some folks seem to get along
just fine without one. Just kidding ;) )
Directions: Choose a line to start with and draw a dot for
the first chapter. Read each chapter, assessing whether the tension is higher,
even, or lower to the tension of the last chapter. If it’s higher, draw the dot
above the last chapter’s dot and connect the lines. If lower, draw the dot on
the line below. If even, draw the dot on the same line. Connect the dots and
see if the tension in your manuscript has that classic rise and fall, peaking
at the climax.

Options: As you can see in the picture above, I took a more
detailed route. I wrote the names of each chapter on the horizontal axis and
used the vertical axis to measure tension.
I also marked out the plot points in purple, pinch points in
pink, and other plot-significant events, according to the 3 Act Structure.
I measured the rise of action in pink and the fall in purple.
On a few chapters, I drew an X in pencil to mark my
strongest chapters. I’ll go over this more in the next technique. Depending on
your word count, choose an appropriate amount of strongest chapter. Go for
around one strong chapter per 10,000 words you have. That means roughly five
strong chapters for a 50,000 word manuscript, ten for 100,000 words and so on.
I drew little droplets on the chapters that she cried. I was
concerned about her being too melodramatic.
I also grouped the chapters together and wrote how many pages they
took with a purple highlighter. This won’t make sense now, but it will once you
understand the next technique.
Technique #3: The Shrunken Manuscript
This one’s also tons of fun!

Purpose: To look at the entirety of your novel at a glance.
Materials Needed:
Ideally 30 Pages of Your Manuscript (To get your manuscript
to 30 pages, you’ll have to shrink the font—make sure it’s still legible up close! If it’s
still not 30 pages, try shrinking the margins or splitting the text into two
columns. I have around 100,000 words for my manuscript, so 60 pages was the
smallest I could go.)
Highlighters!
A Wide Space
Directions: Spread your manuscript out on a very large table
or a cleared floor. Use the pink highlighter to draw an X over your strongest chapters
(remember to use however many strong chapters is proportional to your
manuscript). If you’d like, you can draw purple boxes around the chapters that
are plot points and pink boxes around the chapters that are pinch points. Make
sure the strong chapters are spread out, so there’s no sagging beginning, middle,
or end.
Now, this really puts your novel into perspective. From
here, choose something you want to work on in your novel. It could be conflict
with your antagonist, settings you use, character interactions, a subplot, etc.
Now use a certain color of highlighter to mark those particular scenes, take a step back, and
see if you’re meeting your goals. This is what I was talking about in The Dot
Test. The chapters were different lengths, so I wrote down on the Dot Test how
many pages a group of chapters took up in the Shrunken Manuscript.
I salute you, fellow editors of stories! Keep on polishing
that story ;)
What interesting writing techniques have you heard of? What
stage of writing are you currently in? How do you edit your novel?
Enjoy your editing!
This is great! I agree that editing is usually underestimated by new writers. It is definitely the bulk of writing, especially for those who don't yet know how to get it right the first time. I love your techniques. Thanks for sharing!
ReplyDeleteMy pleasure, Hannah ;)
DeleteAwesome ideas, Elizabeth! I am in the process of editing right now and this gives me some fun ideas!
ReplyDeleteThank you! Tell me how they work out for you :)
DeleteThanks for these great tips, Liz! I definitely like to get a big-picture sense of my plot structure, so I'll give tips 2 and 3 a try! And I read my writing aloud all the time, it's so helpful! I'll admit, getting a glance at your dot test had me thinking about your story - when will I get to read more?? :)
ReplyDeleteAwesome! I love reading my writing aloud too. It's like going over your work with a fine-toothed comb ;) Hopefully soon! I've started on the "first draft" (quotation marks, since it's a rewrite). I think I'll go ahead and plow through this draft and complete it before posting it to our critique group :)
DeleteThis is a wonderful post. I'm going to bookmark it. :)
ReplyDeleteThank you! I'm glad you found it so helpful :)
DeleteThese are great tips, Liz! Thank you so much for sharing!
ReplyDeleteMy pleasure ;)
Delete